Showing posts with label python. Show all posts

Wednesday, April 11, 2012

Syncing files of two folders in different computers (dirty way)

Recently I submitted my assignment for Distributed System class. I took it too lightly ,and so procrastinated. I started working on it in the 11th hour ,and quickly realized how much FUBAR my situation was. I set up a team of  two Ubuntu virtual machines on my system, and connected them using virtual LAN. 135 lines later I apparently had something which bore a slight resemblance to the thing I was required to make.

I compared the snapshots of the filelist of the source in the previous sync, of the source in present time, and of the target in the present time. Syncing is done accordingly. I used rsync over ssh to efficiently and securely transfer files between the two VMs. The missing files are deleted. One necessary condition for this to work is that the system clock of the two machines must have almost same time. Another problem is that the synchronizations must happen quite frequently. Also, it has not been extended for more than two machines, and for sub-folders.

Luckily, it worked fine enough to fetch marks.

Following is the python script which compared the filelists


Following script drives the main program (does the comparison, transfer, and deletion)


Thursday, December 22, 2011

Markov Chains or random text generation


and then at the end of every line: 'Speak roughly to your tea; it's getting late.' So Alice began to tremble. Alice looked round, eager to see if she were looking over their shoulders, that all the jurymen on to himself as he said in a solemn tone, only changing the order of the jurors were all crowded round it, panting, and asking, 'But who is to do this, so she began again: 'Ou est ma chatte?' which was immediately suppressed by the English, who wanted leaders,

The above lines appear to be lifted from Alice in Wonderland. However, on closer observation it is random rubbish. It is just an implementation of Markov Chains (to which we got introduced while working on our mandatory Project required in partial fulfillment of degree). Markov chains work on the principle that the future depends on the present and not on the past. Consider the example "What is the last word at the end of this ______ ?". Well, you must have guessed the word is "sentence" or "line". Markov chains work in a similar way. We have a set of possible succeeding states and the probability of choosing a state depends on the data, the chain is trained on. In other words, the two words "line" and "sentence" represent two different states. Now, if a person usually uses the word "sentence" more then "line", he is more likely to choose "sentence" as his next state.

I will introduce another term "n-grams". Here, "n" refers to the number of states that will be considered for determining the the future state.

In the following program, the training filename is is given as argument. The n-gram model provides an approximation of the book. Books can be downloaded from http://www.gutenberg.org/

import sys,random
F=open(sys.argv[1])
dic={}
eoS=[]
N=2  #N is equal to (n-1) from the n-gram
W=tuple(['']*N)
for line in F:
    words = line.split()
    for word in words:
        if '' not in W:
            dic.setdefault( W, [] ).append(word)
            if W[-1][-1] in (',' , '.' , '?' , '!'):
                eoS.append(W)
        W =  W[1:] + tuple([(word)])
#
key = ()
count = 10 #number of sentences to be generated
while True:
    if dic.has_key(key):
        word = random.choice(dic[key])
        print word,
        key = (key[1:] + tuple([(word)]))
        if key in eoS:
            count = count - 1
            if count <= 0:
                break
    else:
        key = random.choice(eoS)


Popular implementations are Mark V Shaney and Dissociated press.

Tuesday, December 20, 2011

Sudoku Solver or How to solve Sudoku from its pic | Part 2

Hi friends,
This post as promised is a detailed explanation of the working and code of the functions explained in  previous post (Part 1).
So here it goes:
The first function was __init(): which initialized the sudoku from the sequence 
(like seq='003000000400080036008000100040060073000900000000002005004070062600000000700600500
')
 to the sudoku board and called the update function every time it made an update to a cell value.
Given below is the code of __init() function : 

The two for loops of 'i' and 'j' are used to scan the sequence in a way such that it is easier for the program to apply a value to the 9x9 board . The formula 9*(i)+j comes handy in mapping the values from 'seq' to the board  . The 'if' statement checks whether a cell value is available (non-zero) or not . If it is non-zero the integer value of that cell is stored in variable 'val'  and update function is called .After updating it re-updates the position (i,j) in the grid 'a' with value 'val' as a double check.


Next function is the __update() function . This function takes the grid ,updating value, and the two co-ordinate for the position of the updation as its parameters.Before updating the position with the value it does 3 jobs.
i) It deletes any occurrence of that value 'val' in that particular col.
ii) It deletes any occurrence of that value 'val' in that particular row.
iii) it deletes any occurrence of that value 'val' in that particular block. 
Given below is the code of __update() function :


The two line under the first if does job i), the two line under the next if does job ii) and the m,n, block does job iii).
After this it updates the gird position (i,j) with 'val' and return the grid.


The following functions is the implementation of the main idea that solves the sudoku.
Given below is the code of __Backtrack() function :


The backtrack function calls the complete function to know whether the sudoku is complete or not.
If it is complete it return '1' .
If the sudoku is not complete then the function searches for the smallest non-one length value of a cell.
The long line below the first else does this . 
If this length is found out to be zero then it means that the sudoku is in a state where that particular cell can't have any value. Hence it return 0 as this sudoku is faulty and will not yield the correct solution.
If the smallest non-one length value of the board is not zero then it means that this particular cell is going to have  one of these value. The function hence copies all these possible values in temp , and for each value in 'temp'  it makes a copy of the original grid with the position (m,n) having value temp replaced with a single number value from temp.Next line makes an update in the position with this value and update the whole board according to this change by calling __update() function and the assigns  the value in temp to position (m,n) as a double check.
the grid having been changed is sent back for backtracking and if the result is true the program copies the output to an output file using the out_file() function and makes an exit.


The 4th function __complete() could have also been written in the __backtrack() function but I separated it to make the backtrack function look simple.
The code for complete simply iterates over the whole grid ,it is provided with, and return 0 if there is a non-one length value in the grid and 1 otherwise.
Code of _complete() function is provided below :


Next function __out_file() is a dummy function that copies the state of the grid it is provided with to a file.
One may code this function according to his/her will.
Code for My _out_file() function is provided below :


List in this list is the 'main()' function . It  first creates the grid a 9x9 string DDA and calls the _init() function to initialize the grid and then the __backtrack() function which would solve the sudoku and print the output in a separate file.
Code for the main() function is given below :


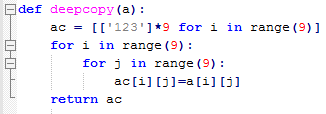
Apart from these six function i also used a self define deepcopy() function for making the copies of the grid in backtrack function.
Code for my deepcopy function is given below : 


Sunday, December 11, 2011

Sudoku Solver or How to solve Sudoku from its pic | Part 1

Hi felas ,
This post is the discription of my way of solving a sudoku (in code). Both Utsav and I were eager to code the solver for sudoku and so we both have have our own version of Sudoku Solver.
Since both of these codes were base on backtracking ,they are similar in there basic approach but differ in implementation  . My code is in python using a DDA (or Double Dimensional list as they are called in python) of strings as the Sudoku board.

The input of the incomplete sudoku is accepted in the form of a sequence of 81 numbers where the numbers in the sequence are the 81 cell values for the 9x9 sudoku . The value zero corresponds to an incomplete cell where as any other value(a single integer from 1-9) is considered as the value  for that cell.
Ex: seq = '003000000400080036008000100040060073000900000000002005004070062600000000700600500'

the sudoku board is first initialized to a value of '123456789' in each cell. A value in a cell shows the possible values that the particular cell can take . Thus before accepting the question the sudoku board looks somewhat like the image below.


After initialization the Sudoku board is sent to the update function which updates the row,column and block according to each new element updated in a co-ordinate. After updation the Sudoku board looks like the image below.


Finally the backtacking function is called to solve the sudoku.
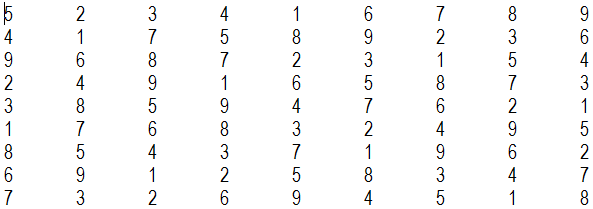
the solved piece looks somewhat like this.


My code consist of 6 important functions including the 'main' .Here they are with the discription of what they do:
1)  _init(): This function initializes the board with the unsolved sudoku.
2)  _update(): This function rules out the possibility of occurrence of a number in other cells.
3)  _backtrack(): As the name suggest this function finds a solution to the initialized sudoku by finding assuming values for each cell with different possible values and then updating the sudoku board using the _update() function.
4)  _complete() : The backtrack function makes use of this function to find the state of sudoku ( Sudoku states are i) right and complete ,  ii) incomplete.
5)  _out_file(): This is a dummy function used only to write the output to a file.
6)  _main(): Finally this is the main function from where the code begins. It calls the init() function to initialize the Sudoku board and then the backtrack function to find the solution.

Detailed explanation of the working and code of these function are discussed in part - 2.

Saturday, December 10, 2011

Sudoku Solver or How to solve Sudoku from its pic | Part 0

Hi.
Its been a while since we made any post. Well, nothing held our attention long enough can be the excuse. There were games to complete, tournaments to win lose, fests to perform in, lots of series to watch, and exams to appear for. Bob Dylan said that "the answer, my friend, is blowing in the wind", and likewise to look for our answers, we changed our direction with the wind and kind of lost track of time. Coming straight to the point, we once thought of making some weekend project, things that take just a weekend to complete. However, we were so lazy in the weekends that nothing happened, and we ended up executing the project in our weekdays.

Allow me to explain the motivation behind our work. Sudoku were a craze this semester. Most in the class survived the onslaught of sleep in the lectures by solving Sudoku puzzles that come daily in the newspaper. However, the issue was sometimes we got stuck and would enter denial of service mode, where we ceased to respond to the outer world. We could use a little hint. However, we needed to wait a whole day for the solution to come. Therefore, we come up with the idea of implementing a solver, to which we feed the image of the puzzle and in turn, it returns the solution.

Now, I will walk you through the steps involved.

The image of the Sudoku is


After converting to grayscale and thresholding,


Then, get the area of interest, i.e the grid


Crop the original image to get the puzzle only


After some cleaning, it will look like


Then, the digits are segmented and identified


Last, the puzzle is solved


Technologies used are MATLAB and Python. All the above steps except the last are carried out by a MATLAB script, and the last is done by a python script.
This is the basic working model. We still need to handle rotation and skewness due to perspective. Also, better recognition algorithms are to be used. 
In the subsequent posts we will talk about our approach in detail.

Saturday, July 2, 2011

ShoutOut: using google app engine to ping a number of people at the same time

This is the script i used to message to many of my friends at a time

from google.appengine.api import xmpp from google.appengine.ext import webapp from google.appengine.ext.webapp.util import run_wsgi_app from google.appengine.ext.webapp import xmpp_handlers user1="%s said:" dirc=[] class XMPPHandler(xmpp_handlers.CommandHandler):     def text_message(self, message=None):         global dirc         #message.reply("yo man")         myname=unicode(message.sender.split('.')[0].lower()) + '.com'         for dir in dirc:          if myname in dir:           for x in dir:            if myname != x:             xmpp.send_message(x,user1 % myname)             xmpp.send_message(x, message.body)     def start_command(self, message=None):         global dirc         dir=message.body.split(' ')[1].split(';')         dirc[len(dirc):]=[dir[0:]]         myname=message.sender.split('.')[0]         for x in dirc[len(dirc)-1]:          xmpp.send_message(x,"chat session started by %s" % myname)          xmpp.send_message(x,"now in session are:")          for y in dirc[len(dirc)-1]:  xmpp.send_message(x,y)     def stop_command(self, message=None):      i=-1      myname=unicode(message.sender.split('.')[0].lower()) + '.com'      for dir in dirc:       i=i+1       if myname in dir:           for x in dir:          xmpp.send_message(x,"Session Stopped")         del dirc[i] application = webapp.WSGIApplication([('/_ah/xmpp/message/chat/', XMPPHandler)],                                      debug=True) def main():     run_wsgi_app(application) if __name__ == "__main__":     main()

Here the Google App Engine acts as a middleman. A sort of chatroom is formed between a number of users and message belonging to a group is relayed to all members of the group.
A sends a message which B and C receive.
A------->App Engine----->B
                             |
                             |
                            V
                     C
A group chat is started by using /start username1;username2;usernameN
It is stopped by /stop
I kinda stopped working on it. A lot of improvements are to be done. One reason I stopped working on it is because Gmail has this thing inbuilt.
Will come up with an explaination soon. Bear with me.

Friday, June 24, 2011

Shoot the Bonkars (Simple 2-D FPS Game)


My aim with this tutorial is to share the experience i had of designing a 2-D FPS inPython. I will try and be as precise as i can and the the same time not go into theunnecessary details.Devel's Requirements Windows platform with python 2.4/2.5/2.6(I used Python 2.5) Pygame : this provides you with the basic functions to handle events like mouse click, key press. (I used Pygame 1.9.1) Text Editor: I used Notepad++. Basics Knowledge of coding in Python(FOR,WHILE,IF,Function Calling).

    Now (asuming you have all the Devel's Requirement mentioned above) we proceed to using Pygame to create a 2-D FPS.

    Opening A window

    1.)First thing that we need to do is create an open window in which the game would run.
    The following code opens a window in Python
    #!/usr/bin/python -tt import pygame
    from pygame.locals import *def main():  
    screen = pygame.display.set_mode((800, 600))
    if __name__ == '__main__':   
    main()

    CODE DESCRIPTION

    import pygame # this imports pygame in the code so that we can use the subroutines it provides(like those for images,sound etc)
    from pygame.locals import * # this imports a number of functions and constants into the top-level namespace. It isn’t essential to do this in order to use Pygame, but it is convenient because we don’t have to precede frequently used values with the pygame namespace.
    def main() # this creates the main function
    screen=...(800,600) # this is the only line in the above program that gives result . it opens a screen of size (800x600) as given.
    if __name......main() # this calls the main function.

    The screen closes as soon as the program terminates. Whats next required is a way to keep that window open until we want to close it. This can be doen by adding a while loop after displaying the screen. The while loop must be inatialise to true to keep the screen open and exit be made when we click on the close button of the screen.

    2.)The code given below does the required job. Add it after the screen=...(800,600) line
    while True:
      for event in pygame.event.get():
       if event.type == QUIT:    
          exit()

    CODE DESCRIPTION
    while True: # this line starts a continuous while loop to maintain the screen open.
    for .....event.get(): # this line iterates through all events in the code.
    if .....==QUIT # this line checks for the event QUIT (click on close button).
    exit() # this close the while and makes the exit.

    3.)Next thing we are going to add is image.
    Adding any image to the screen is a 3-step process.
    i)- Load the image hard drive as surface containing the image data and convert the image to the same format as our display.
    ii)-Load this converted surface on the screen at a desired position (x,y)
    iii)Flip the display

    the code performs the task stated above:
    background = pygame.image.load("image1.png").convert() # Does task i
    screen.blit(background, (x, y)) # Does task ii)
    pygame.display.flip() # does task iii)

    obviously the last 2 line (task needs to be inside the while loop if you are performing operations )
    if you rather prefer to color your screen background with some color, Type the code below
    screen.fill((RR,GG,BB))
    obviously (RR,GG,BB) is the color code.

    4.)using the above method i planted 4-images (small 50x50) on screen at random positions and made them move here and there at constant speed. the images also bounced back(changed there direction on colliding with any of the 4 walls or boundary).

    5.)Now you have got your bonkars . All you need now is a bullet to shoot and a cannon to shoot from. For this have the cannon's position fixed say at bottom center of the screen (at 400,550 on a 800x600 screen).Paste the picture of a cross-wire on the mouse position .Get the mouse position with command "pygame.mouse.get_pos()" and then write an equation to propagate the bullet from cannon's position to the mouse position at the shoot-time.

    6)If u want only 1 bullet then avoid shooting bullets until the previous one's co-ordinate has left the screen. Otherwise if you want more than one bullets keep an array of flags that indicates whether a bullet is in use or not together with its co-ordinates. If the co-ordinatesof the bullets have left the screen the particular bullets flag is again set as "not in use". If all bullets are in use then you may flash "overheat" as a signal to the user to stop for some time.


    using these ideas i developed my First Game in Python. the code for it is available on the link below............https://sourceforge.net/projects/shootthebonkars/

    Flashing keyboard LEDs


    Here is a simple script to make a keyboard's LED blink
    Copy the script below and save it as .wsf
    Rem blinking LED :vstsv
    <package>
       <job id="vbs">
          <script language="VBScript">
             set WshShell = WScript.CreateObject("WScript.Shell")
               For count=0 to 10
                 WshShell.SendKeys "{CAPSLOCK}"
                 WScript.Sleep 500
                 WshShell.SendKeys "{NUMLOCK}"
                 WScript.Sleep 500
                 WshShell.SendKeys "{SCROLLLOCK}"
                 WScript.Sleep 500
               Next
          </script>
       </job>
    </package>
    The other alternative for Windows user is to use SendKeys Python module. You can find it here. The page also contains good tutorial and documentation.


    import SendKeys
    SendKeys.SendKeys("""
        {CAPSLOCK}
        {PAUSE 1}
        {NUMLOCK}
        {PAUSE 1}
        {SCROLLLOCK}
        {PAUSE 1}
    """)


    JAVA can be used to get the same results.


    import java.awt.Toolkit;
    import java.awt.event.KeyEvent;
    
    
    public class SendKeys {
    
    
     public boolean numlock(boolean s) {
      Toolkit tool = Toolkit.getDefaultToolkit();
      try {
       tool.setLockingKeyState(KeyEvent.VK_NUM_LOCK, s);
      } catch (Exception e) {
       return false;
      }
      return true;
     }
    
    
     public boolean capslock(boolean s) {
      Toolkit tool = Toolkit.getDefaultToolkit();
      try {
       tool.setLockingKeyState(KeyEvent.VK_CAPS_LOCK, s);
      } catch (Exception e) {
       return false;
      }
      return true;
     }
    
    
     public boolean scrolllock(boolean s) {
      Toolkit tool = Toolkit.getDefaultToolkit();
      try {
       tool.setLockingKeyState(KeyEvent.VK_SCROLL_LOCK, s);
      } catch (Exception e) {
       return false;
      }
      return true;
     }
    
    
     public static void main(String[] args) throws Exception {
      SendKeys flasher = new SendKeys();
    
    
      for(int i=0;i<10;i++){
                       flasher.numlock(true);
                      Thread.sleep(500);
                      flasher.numlock(true);
                      Thread.sleep(500);
                      flasher.capslock(true);
                      Thread.sleep(500);
                      flasher.capslock(true);
                      Thread.sleep(500);
                      flasher.scrolllock(true);
                      Thread.sleep(500);
                      flasher.scrolllock(true);
                      Thread.sleep(500);
                }
     }
    }