Thursday, December 22, 2011

Markov Chains or random text generation


and then at the end of every line: 'Speak roughly to your tea; it's getting late.' So Alice began to tremble. Alice looked round, eager to see if she were looking over their shoulders, that all the jurymen on to himself as he said in a solemn tone, only changing the order of the jurors were all crowded round it, panting, and asking, 'But who is to do this, so she began again: 'Ou est ma chatte?' which was immediately suppressed by the English, who wanted leaders,

The above lines appear to be lifted from Alice in Wonderland. However, on closer observation it is random rubbish. It is just an implementation of Markov Chains (to which we got introduced while working on our mandatory Project required in partial fulfillment of degree). Markov chains work on the principle that the future depends on the present and not on the past. Consider the example "What is the last word at the end of this ______ ?". Well, you must have guessed the word is "sentence" or "line". Markov chains work in a similar way. We have a set of possible succeeding states and the probability of choosing a state depends on the data, the chain is trained on. In other words, the two words "line" and "sentence" represent two different states. Now, if a person usually uses the word "sentence" more then "line", he is more likely to choose "sentence" as his next state.

I will introduce another term "n-grams". Here, "n" refers to the number of states that will be considered for determining the the future state.

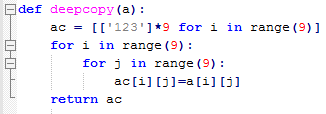
In the following program, the training filename is is given as argument. The n-gram model provides an approximation of the book. Books can be downloaded from http://www.gutenberg.org/

import sys,random
F=open(sys.argv[1])
dic={}
eoS=[]
N=2  #N is equal to (n-1) from the n-gram
W=tuple(['']*N)
for line in F:
    words = line.split()
    for word in words:
        if '' not in W:
            dic.setdefault( W, [] ).append(word)
            if W[-1][-1] in (',' , '.' , '?' , '!'):
                eoS.append(W)
        W =  W[1:] + tuple([(word)])
#
key = ()
count = 10 #number of sentences to be generated
while True:
    if dic.has_key(key):
        word = random.choice(dic[key])
        print word,
        key = (key[1:] + tuple([(word)]))
        if key in eoS:
            count = count - 1
            if count <= 0:
                break
    else:
        key = random.choice(eoS)


Popular implementations are Mark V Shaney and Dissociated press.

Tuesday, December 20, 2011

Sudoku Solver or How to solve Sudoku from its pic | Part 3

Hello.
In this post, I will discuss about the first few phases of the work. The system needs lots of improvements, which include technology used and the approach followed. Anyways, it was all part of a learning process.

First the image is converted to greyscale, then thresholding is performed on the image and we obtain a binary image. Thresholding can be used to distinguish background from foreground. Usually in simple images, the threshold value is the mean or median of all the pixel values present in it. Pixels whose value is greater than the threshold is assigned a value 1 or otherwise 0. The situation can also be reversed. However, setting a global thresholding value has a drawback - it cannot handle changing lighting conditions e.g. those happening due to strong illumination gradient or shadows. This problem can be solved using adaptive thresholding (also known as local or dynamic thresholding). It is based on the assumption that the illumination throughout a small region will be uniform. This method selects individual thresholds for each pixel based on its neighborhood.

After we get the binary image, we search for the largest blob (based on the assumption that the grid will be the largest blob). Using hough transform on the grid, we can get an estimate of the amount of rotation. We rotate the image to get an upright puzzle area. We crop out the puzzle area and divide it into 9x9 parts. Using template matching, we identify the numbers. template matching is a very naive method. It got confused between 3 and 8, 1 and 4, 2 and 9, 5 and 6. We solved this problem by finding the number of holes in the figure. For example, 8 and 3 has two and zero holes respectively.

The code is as follows. It is rough at the edges and a lot can be improved.


warning('off') 
%% adaptive threshholding
I=imread('sudoku_1.jpg');
I=imrotate(I,30,'bilinear');
J=mat2gray(I);
K=imfilter(J,fspecial('average',10),'replicate');
C = 0.05;
sIM=K-J-C;
bw=im2bw(sIM,0);
%%imshow(bw)

%% get biggest blob
[label, num] = bwlabel(bw,4);
stats = regionprops (label, 'basic');
mx=max([stats.Area]);
mp = find([stats.Area]==mx);
X=label==mp;
%%imshow(X) 
 
%% crop and get the puzzle area
xy=max(1,floor(stats(mp).BoundingBox));
fI=bw(xy(2):xy(2)+xy(4),xy(1):xy(1)+xy(3));
%%imshow(fI) 

%% Rotation
cleanI=X;
cleanI=edge(cleanI,'canny');
[H,theta,rho] = hough(cleanI);
P = houghpeaks(H,5,'threshold',ceil(0.3*max(H(:))));
lines = houghlines(cleanI,theta,rho,P,'FillGap',5,'MinLength',7);
angl=max([lines.theta]);
fI=imrotate(fI,angl-90,'bilinear');
[label, num] = bwlabel(fI,4);
stats = regionprops (label, 'basic');
mx=max([stats.Area]);
mp = find([stats.Area]==mx);
X=label==mp;
xy=max(1,floor(stats(mp).BoundingBox));
fI=fI(xy(2):xy(2)+xy(4),xy(1):xy(1)+xy(3));
fI=fI-X(xy(2):xy(2)+xy(4),xy(1):xy(1)+xy(3)); 

%% segment and identify
sz=size(fI);
s=round(sz/9);
XY=zeros(9,26,18);
box=zeros(9,9);
perc=round(s(1).*s(2)*0.04);
for i=1:9
    filename=strcat('',num2str(i),'.jpg');
    XY(i,:,:)=im2bw(imread(filename));
end
for i =0:8
    for j=0:8
        %subplot(9,9,(9*i+j+1))
        xm=min(sz(1),(i+1)*s(1));
        ym=min(sz(2),(j+1)*s(2));
        gh=fI(i*s(1)+1:xm,j*s(2)+1:ym);
        gh=bwareaopen(gh,perc);
        [label n]=bwlabel(gh,8);
     
        if n >0
            stats=regionprops(label,'BoundingBox','PixelIdxList');
         
            for region =1:length(stats)
                xy=stats(region).BoundingBox;
                if (xy(3) <10 || xy(4) < 10 )
                    label(stats(region).PixelIdxList) = 0;
                end
            end
            gh = (label~=0);
            [label n]=bwlabel(gh,8);
         
            if n < 1
                %imshow(gh)
                continue
            end
            stats=regionprops(label,'basic');
            mx=max([stats.Area]);
            mp = find([stats.Area]==mx);
            gh=label;
            gh(gh==mp)=1;
            xy=stats(mp).BoundingBox;
            if (xy(3)/xy(4) > 0.75 || xy(3)/xy(4) <0.25)
                %imshow(gh)
                continue
            end
            szx=size(gh);
            gh=gh(xy(2):min(xy(2)+xy(4),szx(1)), xy(1):min(xy(1)+xy(3),szx(2)));
            gh=im2bw(imresize(gh,[26,18]));
            gh=bwareaopen(gh,120);
            mx_corr=0;
            for k=1:9
                temp_(:,:)=XY(k,:,:) ;
                temp=sum(sum(gh.*temp_));
                if mx_corr < temp
                    mx_corr=temp;
                    box(i+1,j+1)=k;
                end
            end
            se1=strel('line',2,0);
            se2=strel('line',2,90);
            gh=imdilate(gh,[se1 se2]);
            gh=imerode(gh,[se1 se2]);
            if (box(i+1,j+1)==8 || box(i+1,j+1)==3)
               nx=regionprops(gh,'EulerNumber');
               if (nx(1).EulerNumber==1)
                   box(i+1,j+1)=3;
               else
                   box(i+1,j+1)=8;
               end
            end
            if (box(i+1,j+1)==4 || box(i+1,j+1)==1)
               nx=regionprops(gh,'EulerNumber');
               if (nx(1).EulerNumber==0)
                   box(i+1,j+1)=4;
               else
                   box(i+1,j+1)=1;
               end
            end
         
            if (box(i+1,j+1)==5 || box(i+1,j+1)==6)
               nx=regionprops(gh,'EulerNumber');
               if (nx(1).EulerNumber<=0)
                   box(i+1,j+1)=6;
               else
                   box(i+1,j+1)=5;
               end
            end
            if (box(i+1,j+1)==9 || box(i+1,j+1)==2)
                nx=regionprops(gh,'EulerNumber');
                if (nx(1).EulerNumber<=0)
                    box(i+1,j+1)=9;
                else
                    box(i+1,j+1)=2;
                end
            end
        end
        %imshow(gh)
    end
end
file_=fopen('out_dip.txt','w');
fprintf(file_,'%d',box');
fclose(file_);
[status result]=system('python do.py');
clc
disp(result)
warning on

Sudoku Solver or How to solve Sudoku from its pic | Part 2

Hi friends,
This post as promised is a detailed explanation of the working and code of the functions explained in  previous post (Part 1).
So here it goes:
The first function was __init(): which initialized the sudoku from the sequence 
(like seq='003000000400080036008000100040060073000900000000002005004070062600000000700600500
')
 to the sudoku board and called the update function every time it made an update to a cell value.
Given below is the code of __init() function : 

The two for loops of 'i' and 'j' are used to scan the sequence in a way such that it is easier for the program to apply a value to the 9x9 board . The formula 9*(i)+j comes handy in mapping the values from 'seq' to the board  . The 'if' statement checks whether a cell value is available (non-zero) or not . If it is non-zero the integer value of that cell is stored in variable 'val'  and update function is called .After updating it re-updates the position (i,j) in the grid 'a' with value 'val' as a double check.


Next function is the __update() function . This function takes the grid ,updating value, and the two co-ordinate for the position of the updation as its parameters.Before updating the position with the value it does 3 jobs.
i) It deletes any occurrence of that value 'val' in that particular col.
ii) It deletes any occurrence of that value 'val' in that particular row.
iii) it deletes any occurrence of that value 'val' in that particular block. 
Given below is the code of __update() function :


The two line under the first if does job i), the two line under the next if does job ii) and the m,n, block does job iii).
After this it updates the gird position (i,j) with 'val' and return the grid.


The following functions is the implementation of the main idea that solves the sudoku.
Given below is the code of __Backtrack() function :


The backtrack function calls the complete function to know whether the sudoku is complete or not.
If it is complete it return '1' .
If the sudoku is not complete then the function searches for the smallest non-one length value of a cell.
The long line below the first else does this . 
If this length is found out to be zero then it means that the sudoku is in a state where that particular cell can't have any value. Hence it return 0 as this sudoku is faulty and will not yield the correct solution.
If the smallest non-one length value of the board is not zero then it means that this particular cell is going to have  one of these value. The function hence copies all these possible values in temp , and for each value in 'temp'  it makes a copy of the original grid with the position (m,n) having value temp replaced with a single number value from temp.Next line makes an update in the position with this value and update the whole board according to this change by calling __update() function and the assigns  the value in temp to position (m,n) as a double check.
the grid having been changed is sent back for backtracking and if the result is true the program copies the output to an output file using the out_file() function and makes an exit.


The 4th function __complete() could have also been written in the __backtrack() function but I separated it to make the backtrack function look simple.
The code for complete simply iterates over the whole grid ,it is provided with, and return 0 if there is a non-one length value in the grid and 1 otherwise.
Code of _complete() function is provided below :


Next function __out_file() is a dummy function that copies the state of the grid it is provided with to a file.
One may code this function according to his/her will.
Code for My _out_file() function is provided below :


List in this list is the 'main()' function . It  first creates the grid a 9x9 string DDA and calls the _init() function to initialize the grid and then the __backtrack() function which would solve the sudoku and print the output in a separate file.
Code for the main() function is given below :


Apart from these six function i also used a self define deepcopy() function for making the copies of the grid in backtrack function.
Code for my deepcopy function is given below : 


Sunday, December 11, 2011

Sudoku Solver or How to solve Sudoku from its pic | Part 1

Hi felas ,
This post is the discription of my way of solving a sudoku (in code). Both Utsav and I were eager to code the solver for sudoku and so we both have have our own version of Sudoku Solver.
Since both of these codes were base on backtracking ,they are similar in there basic approach but differ in implementation  . My code is in python using a DDA (or Double Dimensional list as they are called in python) of strings as the Sudoku board.

The input of the incomplete sudoku is accepted in the form of a sequence of 81 numbers where the numbers in the sequence are the 81 cell values for the 9x9 sudoku . The value zero corresponds to an incomplete cell where as any other value(a single integer from 1-9) is considered as the value  for that cell.
Ex: seq = '003000000400080036008000100040060073000900000000002005004070062600000000700600500'

the sudoku board is first initialized to a value of '123456789' in each cell. A value in a cell shows the possible values that the particular cell can take . Thus before accepting the question the sudoku board looks somewhat like the image below.


After initialization the Sudoku board is sent to the update function which updates the row,column and block according to each new element updated in a co-ordinate. After updation the Sudoku board looks like the image below.


Finally the backtacking function is called to solve the sudoku.
the solved piece looks somewhat like this.


My code consist of 6 important functions including the 'main' .Here they are with the discription of what they do:
1)  _init(): This function initializes the board with the unsolved sudoku.
2)  _update(): This function rules out the possibility of occurrence of a number in other cells.
3)  _backtrack(): As the name suggest this function finds a solution to the initialized sudoku by finding assuming values for each cell with different possible values and then updating the sudoku board using the _update() function.
4)  _complete() : The backtrack function makes use of this function to find the state of sudoku ( Sudoku states are i) right and complete ,  ii) incomplete.
5)  _out_file(): This is a dummy function used only to write the output to a file.
6)  _main(): Finally this is the main function from where the code begins. It calls the init() function to initialize the Sudoku board and then the backtrack function to find the solution.

Detailed explanation of the working and code of these function are discussed in part - 2.

Saturday, December 10, 2011

Sudoku Solver or How to solve Sudoku from its pic | Part 0

Hi.
Its been a while since we made any post. Well, nothing held our attention long enough can be the excuse. There were games to complete, tournaments to win lose, fests to perform in, lots of series to watch, and exams to appear for. Bob Dylan said that "the answer, my friend, is blowing in the wind", and likewise to look for our answers, we changed our direction with the wind and kind of lost track of time. Coming straight to the point, we once thought of making some weekend project, things that take just a weekend to complete. However, we were so lazy in the weekends that nothing happened, and we ended up executing the project in our weekdays.

Allow me to explain the motivation behind our work. Sudoku were a craze this semester. Most in the class survived the onslaught of sleep in the lectures by solving Sudoku puzzles that come daily in the newspaper. However, the issue was sometimes we got stuck and would enter denial of service mode, where we ceased to respond to the outer world. We could use a little hint. However, we needed to wait a whole day for the solution to come. Therefore, we come up with the idea of implementing a solver, to which we feed the image of the puzzle and in turn, it returns the solution.

Now, I will walk you through the steps involved.

The image of the Sudoku is


After converting to grayscale and thresholding,


Then, get the area of interest, i.e the grid


Crop the original image to get the puzzle only


After some cleaning, it will look like


Then, the digits are segmented and identified


Last, the puzzle is solved


Technologies used are MATLAB and Python. All the above steps except the last are carried out by a MATLAB script, and the last is done by a python script.
This is the basic working model. We still need to handle rotation and skewness due to perspective. Also, better recognition algorithms are to be used. 
In the subsequent posts we will talk about our approach in detail.

Sunday, July 10, 2011

simple Port Scanner

Back in my sixth semester Computer Networks lab, we had to write a simple port scanner (port 0 to 1024). The basic principle was to see whether a connection could be made at a port. If connection can be made, it is open, or else it is closed. I had used the following code then. However, it took 17 minutes to perform the scan.

import java.io.IOException; import java.net.InetAddress; import java.net.Socket; import java.net.UnknownHostException; public class port_scanner { static Socket soc; public static void main(String[] args) throws IOException { for(int i=1;i<1024;i++){ try{ soc= new Socket(InetAddress.getLocalHost(),i); System.out.println("port "+i+" open"); soc.close(); }catch(IOException e){ System.out.println("port "+i+" closed"); } } } }

The better option was to use threading. I was lazy back then and the above program was sufficient to fetch me marks, and so I did not write a multi-threaded code. I needed to brush up threading because placements are going to start soon. Therefore, I implemented the multi-threaded version. It took just 2 seconds to perform the scan.

import java.io.IOException; import java.net.InetAddress; import java.net.Socket; class myThread implements Runnable{ Thread t; Socket soc; boolean state=true; int port; myThread(int port){ this.port=port; t=new Thread(this,"Thread"); t.start(); } boolean getState(){ return state; } @Override public void run(){ try{ soc= new Socket(InetAddress.getLocalHost(),port); soc.close(); }catch(IOException e){ state=false; } } } public class new_prt { static myThread threads[] = new myThread[1024]; public static void main(String args[]){ for(int j=0;j<1024;j++){ threads[j]=new myThread(i); } for(int j=0;j<1024;j++){ try{ threads[j].t.join(); if(threads[j].getState()==true) System.out.println("port "+threads[j].port + " open"); else System.out.println("port "+threads[j].port + " closed"); }catch(InterruptedException e){ } } } }

Monday, July 4, 2011

SCP or how to securely transfer files

scp is a useful command. It works on top of ssh.
To transfer file from local to remote:
scp sourcefile user@remoteserver:/path_target/

To transfer from remote to local:
scp user@remoteserver:/path_source/sourcefile /path_target/
Note: if the target is current directory then '.' can be used as in scp user@remoteserver:/path_source/sourcefile .
if the target is the parent directory current directory then '..' can be used as in scp user@remoteserver:/path_source/sourcefile ..

To transfer files from one remote to another remote:
scp user@remoteserver1:/path_source/sourcefile user@remoteserver2:/path_target/
Note: the server must be able to reach each other because files will be transferred directly between them.

To transfer using some specified port:
scp -P port_number user@remoteserver:/path_source/sourcefile .

To transfer all files in a directory:
scp user@remote:/source_path/* .

To transfer a directory recursively:
scp -r user@remote:/source_path/ .

To limit bandwidth used:
scp -l bandwidth user@remoteserver:/path_source/sourcefile .

To view file in remote machine:
vi scp://user@remote/source_path/remotefile

To compare files:
vimdiff scp://user@remote/source_path/remotefile localfile

Ping FU or (ping for u)

I learnt about these commands in my Computer Network classes. I didn't know about these commands initially. Well, I am still learning. One of the commands is
Ping: Packet Internet Groper. Imagine a sonar. Ping is similar. Also, sonar makes a ping sound. Here is a site dedicated to the ping. An interesting introduction can be found there.
The way this works is the computer or device will generate an ICMP packet that is sent over the local network or internet. The ICMP packet will find its way across the network by having a source and destination IP address. When the device receives this information it then sends a reply saying “yes, I am here”.
Ping depends on ARP and DNS.


ping IP 
ping hostname
It is as simple as that. Press enter and packets are sent out and you find out whether the IP is reachable or not. But first you need to check whether the network is up by pinging yourself. Your machine is "localhost" or "127.0.0.1". Ping any of them or 0. Packets will be sent until Ctrl+C is pressed
ping localhost
ping 127.0.0.1
ping 0


Now the options are like ornaments to the basic ping. They do add an edge when used creatively. 
-c specify the number of echo requests. 
in the following example ping sends 3 packets. Notice that although 58 bytes are sent, 64 bytes are received. The extra 8 bytes are due to ICMP headers
using ping the ip can be found if the host name is given. In the following example, the ip of facebook is found

-i specify the number of seconds between each ping. If the interval is less than 0.2 seconds, superuser privileges are required.
One trick with this option is to simulate sleep. You only need to redirect the output to a bit bucket. In Unix or Linux /dev/null and in windows NUL is the bit bucket.
in the example below, the interval will be of 2 seconds and also the simulation of sleep is shown.

-a gives a beep sound when host is reachable. This thing can help by removing the need to look into the screen to check about successful ping

-f ping flood. By default, the interval between pings is set to zero seconds. It send an echo request immediately after receiving the reply to the previous one. I writes a '.' when a packet is sent and a backspace when reply is received. Super user privileges are required for this. In the following example, 20171 packets were sent and received in around 2.8 seconds.

-q Quiet mode.Prints only ping command statistics.

-s Set packet size.  In the following example, size of ping packet is set to 50. However, 78 bytes of data are sent. The additional 28 bytes belong to IP header and ICMP payload. 
This option was, once upon time, to used to create the ping of death.

-w Set deadline. It is used to set the total amount of time the ping packets should be sent. If it is use with -c then, whichever comes first will terminate the sending of packets. Again, this option can be used as a repalcement for the sleep command by directing the output to the bit bucket (/dev/null). In the example below, deadline is set to 2 seconds.

-p Ping pattern. Upto 16 padding bytes to fill out the packet sent can be specified. This is useful for diagnosing data-dependent problems in a network. In the following example, 2 bytes of alternating 0s and 1s is used.

-R Records route. Turns on route recording for the Echo Request packets, and display the route buffer on returned packets (ignored by many routers).

ping hop1 hop2 hop3 hop4 destination This can be used to set the path for ping.

press Ctrl+| (SIGQUIT) to get short summary as shown below


Saturday, July 2, 2011

ShoutOut: using google app engine to ping a number of people at the same time

This is the script i used to message to many of my friends at a time

from google.appengine.api import xmpp from google.appengine.ext import webapp from google.appengine.ext.webapp.util import run_wsgi_app from google.appengine.ext.webapp import xmpp_handlers user1="%s said:" dirc=[] class XMPPHandler(xmpp_handlers.CommandHandler):     def text_message(self, message=None):         global dirc         #message.reply("yo man")         myname=unicode(message.sender.split('.')[0].lower()) + '.com'         for dir in dirc:          if myname in dir:           for x in dir:            if myname != x:             xmpp.send_message(x,user1 % myname)             xmpp.send_message(x, message.body)     def start_command(self, message=None):         global dirc         dir=message.body.split(' ')[1].split(';')         dirc[len(dirc):]=[dir[0:]]         myname=message.sender.split('.')[0]         for x in dirc[len(dirc)-1]:          xmpp.send_message(x,"chat session started by %s" % myname)          xmpp.send_message(x,"now in session are:")          for y in dirc[len(dirc)-1]:  xmpp.send_message(x,y)     def stop_command(self, message=None):      i=-1      myname=unicode(message.sender.split('.')[0].lower()) + '.com'      for dir in dirc:       i=i+1       if myname in dir:           for x in dir:          xmpp.send_message(x,"Session Stopped")         del dirc[i] application = webapp.WSGIApplication([('/_ah/xmpp/message/chat/', XMPPHandler)],                                      debug=True) def main():     run_wsgi_app(application) if __name__ == "__main__":     main()

Here the Google App Engine acts as a middleman. A sort of chatroom is formed between a number of users and message belonging to a group is relayed to all members of the group.
A sends a message which B and C receive.
A------->App Engine----->B
                             |
                             |
                            V
                     C
A group chat is started by using /start username1;username2;usernameN
It is stopped by /stop
I kinda stopped working on it. A lot of improvements are to be done. One reason I stopped working on it is because Gmail has this thing inbuilt.
Will come up with an explaination soon. Bear with me.

XMPP or (How to programatically do stuffs in IM)

Hi.
It's been a while since I worked with the Smack API.... 6 months and so I might have forgotten many things. Anyways, it is a brief introduction to XMPP and more specifically to Smack API. It provides Java libraries for playing around with XMPP.


The above snippet will connect to the gmail server and make an status update.

Presence presence =new Presence(Presence.Type.available,
status,
24,
Presence.Mode.available);
Here Presence.Type is a enum to represent the presecence type. Note that presence type is 
often confused with presence mode. Generally, if a user is signed into a server, they have a 
presence type of available, even if the mode is away, dnd, etc. The presence type is only 
unavailable when the user is signing out of the server
status contains the string which you want to set as your status.
24 is the priority. The highest priory client will receive the packets.
Check this out for better documentation of Presence.


Add
Roster roster = connection.getRoster();
System.out.println("No of contacts: " + roster.getEntryCount());
for (RosterEntry entry : roster.getEntries())     
System.out.println("User: " + entry.getUser());
The above code will show the size of your roster and also show the user list

Message msg=new Message(user@gmail.com",Message.Type.chat);
msg.setBody("ssup?");
connection.sendPacket(msg);
Use this to send IM to some user.

presence.setStatus(status);
connection.sendPacket(presence);
Use this to change status.
There are many fun things that you can do with this. You can make your status rotate, write the lyrics of your favourite song line by line, flood, or change your status from busy to available and vice-versa continuously to get a alternating red-green thing.
Do your thing and please share it. Will love to learn from you.

System Monitoring basics

This is just an overview of few of the system administration tools. Infos about what programs are running, how much memory or how much cpu cycles are being used, who are logged in and for how long. 


top: it provides a lot of information about the processes running, percentatage of the cpu and th ememory being consumed by that process, who owns the process and its Process ID. It also shows the uptime and memory usage. The output is a dynamic full screen.  Using hot key k any process can be killed. Press M to sort by memory, P to sort by %CPU and S to sort by time.
duit shows the disk usage(in Kb) of each directory and sub-directories. It checks recursively and starts from the current folder by default. By supplying a name you can make it start from there.
Options: (these may vary with version run, and there are more ;)
-a (--all) Prints usage for ALL files, not just the subdirectories
-b (--bytes) Prints usage in bytes rather than Kb.
-s (--summarize) Prints ONLY the total usage of the directory
df: this command tells about the amount of free space on all mounted file system, or the name of a device can be specified. It will show the size, used space, available space, used% and mount information.
ps: this command shows what processes are running with your user id. ps aux command gives additional information about all processes. This is similar to top except that it gives only a snapshot and is not updated. 
vmstat: This command  reports information about processes, memory, paging, block IO, traps and cpu activity. 
-a Gives information about Active/Inactive Memory Pages
-m Displays Memory utilization
who: It displays the users who are logged into the system
uptime: to get the uptime, together with the current time, the number of users and load averages for the past 1, 5 and 15 minute intervals
w: It displays information about users currently logged into the machine and their processes. It is a combination of who, uptime, and ps.
free: shows information about the machine's memory. This includes physical memory (RAM), swap as well as the shared memory and buffers used by the kernal. All measurements are in Kb.
iostat: It report Central Processing Unit (CPU) statistics and input/output statistics for devices, partitions and network file systems (NFS).
mpstatdisplays activities for each available processor, processor 0 being the first one. mpstat -P ALL to display average CPU utilization per processor.
man the above commands to learn more